NetBird: Managing user access in a Zero Trust environment
In the last post I reworked my HomeLab’s network to follow Zero Trust principles. This effectively covers how internal services can and can’t talk to each other.
Now, how do we allow external users to interact with our highly restrictive network without breaking the afforementioned principles? The answer to this question is, of course, a VPN.
Choosing our fighter
If you’ve ever browsed HomeLab or Selfhosting related forums you must surely know what most users instantly recommend: Tailscale.
Tailscale is a Wireguard-based VPN that allows you to create a mesh virtual network so easily that it’s scary. It’s almost a “single click to install” experience and doesn’t require you to open any ports on your router. So, what’s the catch?
While its free tier is very generous and I thoroughly recommend it, some of us really value the “self” part of Self-Hosting. By using Tailscale, you rely on a 3rd party to provide you access to your own infra, which can be a big no-no to some people. (PD: I know Headscale exists, but it’s maintained by a single person)
The fully self-hostable and open-source solution to our problem is NetBird.
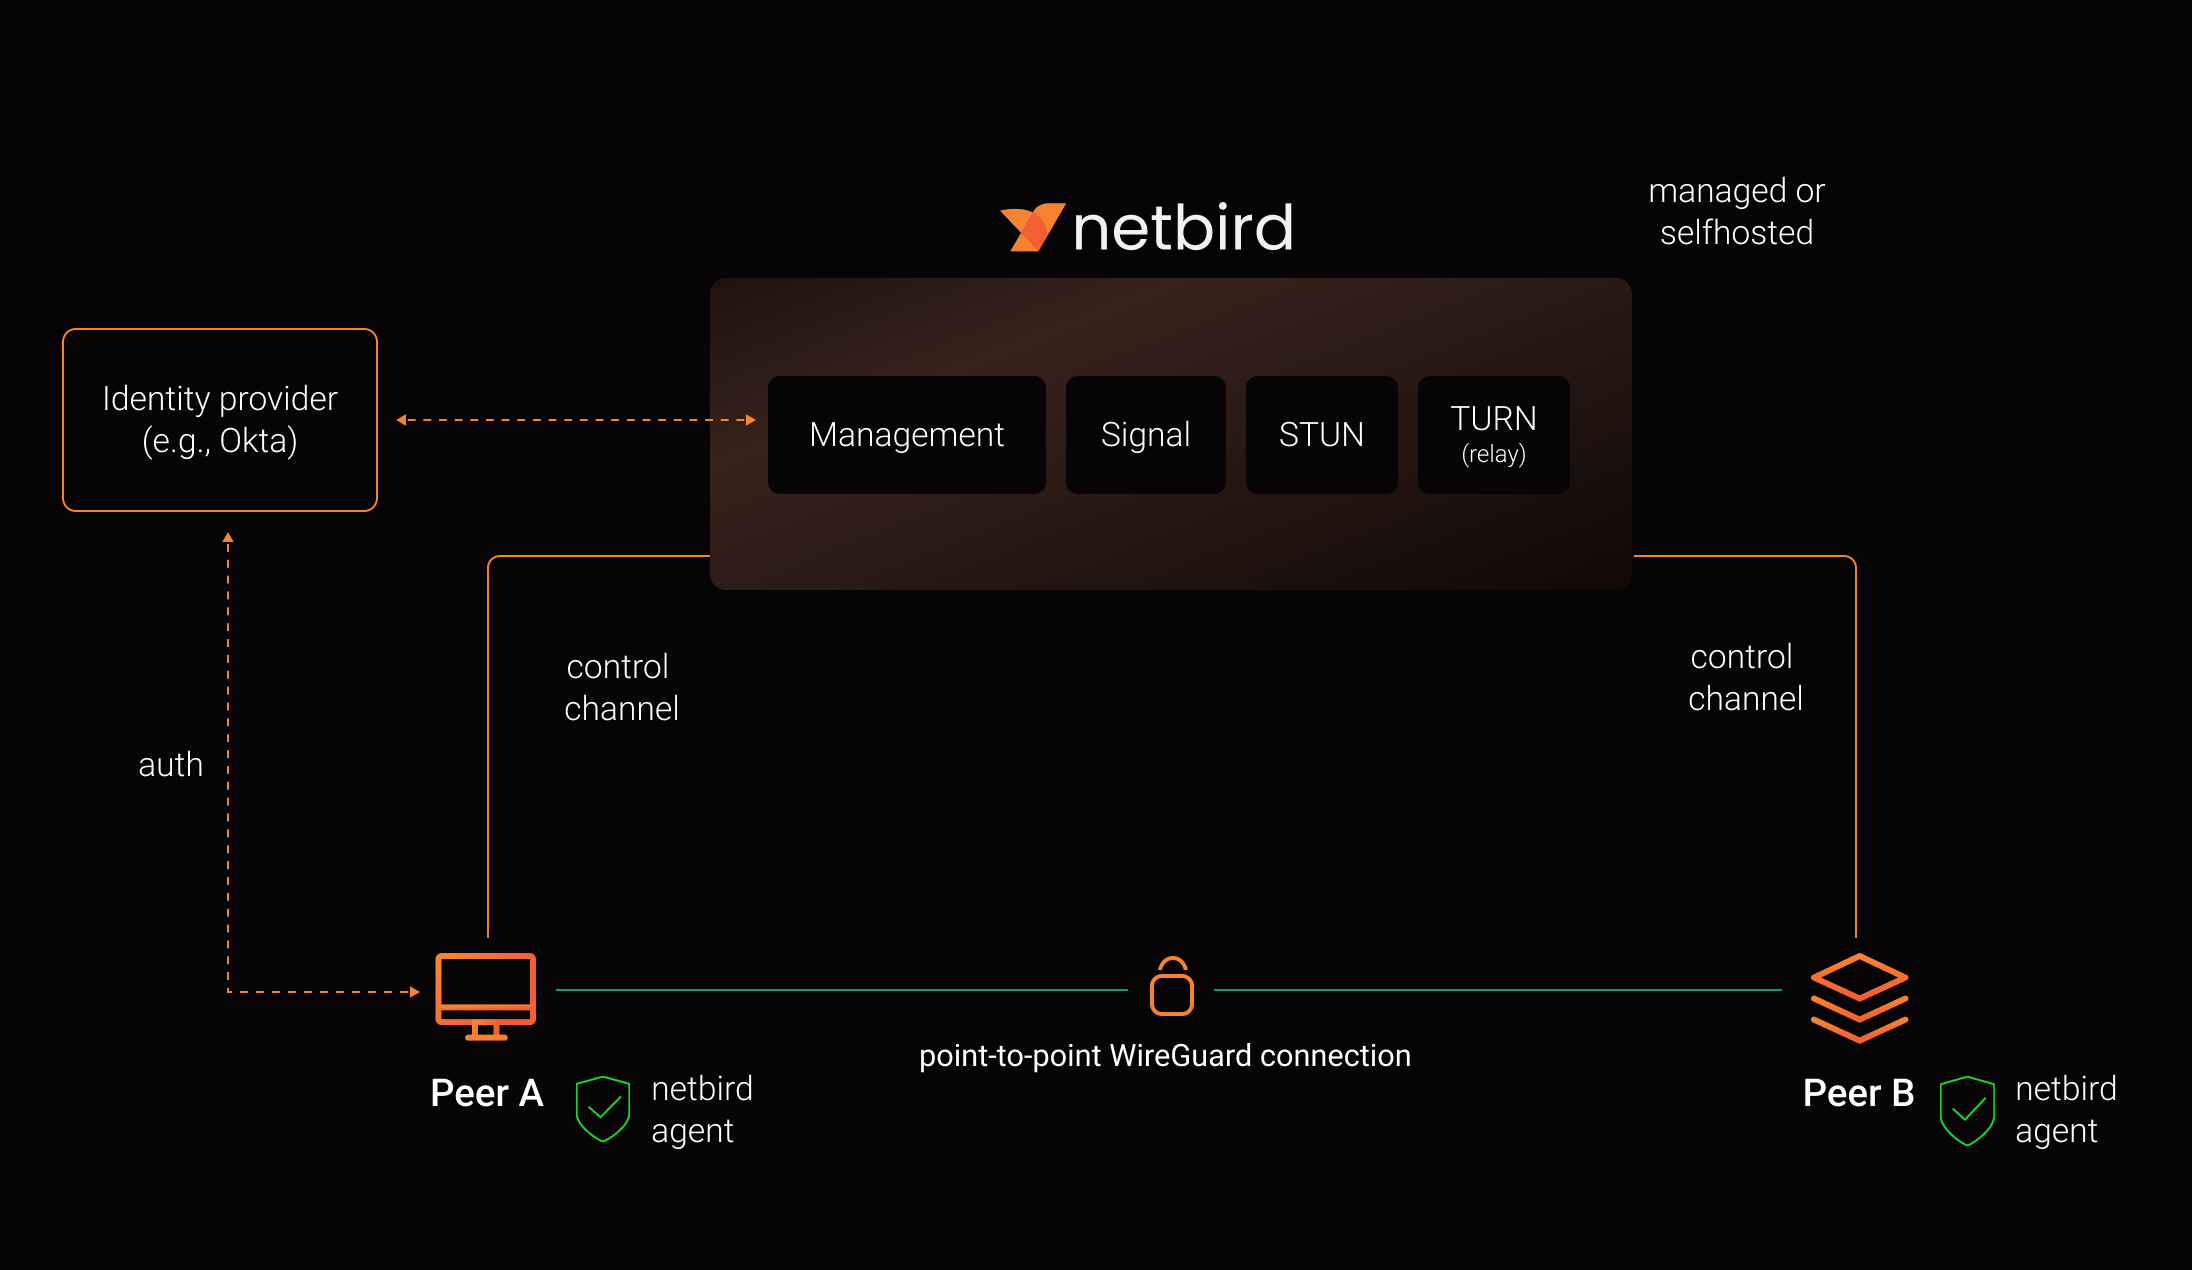
Setting up the playground
Here comes the question of where to host the Netbird Control server. While hosting it on our own physical machines would be the ultimate sovereignity-focused choice, I am choosing to host netbird on a VPS. This comes with the following advantages:
- It’ll allow us to host a VPN server even if our HomeLab is CGNAT’d.
- Security through obscurity: When exposing services to the wide web, I would rather have an enterprise IP be the one exposed than my home’s.
Only tradeoff would be that now you’re relying on a 3rd party provider. It’s all about finding a balance.
Any Linux VPS that has atleast 1vCPU and 2GBs of memory will suffice. But why settle for a weak choice when we can get a fairly powerful one for the awesome amount of 0€? (Hint: It starts with “O” and ends with “racle Cloud”)
OCI offers an “always-free” tier of resources that consists of max 4 vCPUs and 24GBs of memory. Mind you, this is for the Ampere A1 ARM instances, but fret not, plenty of software in Linux works perfectly on the ARM platform.
The steps to set up our own Ampere instance are:
- Create an account at Oracle Cloud.
- Convert the account to a PAYG (Pay as You Go Account).
Why do we do this? When using a free tier account, creating an instance is an almost unwinnable battle against other free users. If we don’t surpass the Always-Free limits (which we won’t with this configuration) Oracle will never bill us. More details here
- You can do this by going to the sidebar on the dashboard and then to the
Billing & Cost Management > Upgrade and Manage > Payment. - Wait. This will take a couple of hours to be fully applied.
- You can do this by going to the sidebar on the dashboard and then to the
- Set up a new instance:
Sidebar > Compute > Instances > Create Instance. There, image is up to the user but make sure that the shape is Ampere VM.Standard.A1.Flex with a max of 2 vCPUs and 12GBs of memory.- In the networks section if no public subnet or virtual cloud networks are present then it’ll prompt to create a new one. A free public IPv4 address can be reserved in
Networking > IP management > Reserved Public IPs.
- In the networks section if no public subnet or virtual cloud networks are present then it’ll prompt to create a new one. A free public IPv4 address can be reserved in
- Configure the OCI Firewall for NetBird usage:
Networking > Virtual Networks > "our VNET" > Security > Default Security List for "our VNET". Here, we should set up the following Ingress rules (apart from the default ones like SSH).
We are now good to go on the Cloud side of things and we can proceed to get our hands on our newly installed Linux system.
Installing Netbird
All instructions are available at https://docs.netbird.io/selfhosted/selfhosted-quickstart
Before proceeding, we need two things:
- Docker
- jq & curl
- A Public Domain that is pointing to the IP address of the Oracle Instance.
| Type | Name | Content |
|---|---|---|
| A | netbird | “Public IP” |
| CNAME | *.netbird | netbird.”ourdomain.tld” |
In case Cloudflare is being used as the DNS Provider, the proxy mode should be disabled for both records.
Then, we should run the following command:
1
curl -fsSL https://github.com/netbirdio/netbird/releases/latest/download/getting-started.sh | bash
The script will ask you to:
- Choose a reverse proxy (built-in Traefik is okay).
- Specify your domain (netbird.yourdomain.tld).
- Choose whether you want the Proxy Service (Useful if you want to expose services through Netbird).
- Choose if you want Crowdsec integration.
Once it’s done, the stack will be deployed and configuration will be available via https://netbird.yourdomain.tld if you have followed every step.
Adding our fleet
First thing into the Netbird setup, the wizard will make us add two devices. One will of course be our working machine (PC/Laptop) and the other could be anything else that you want to be on the Network.
Creating groups
Instead of doing per-device configurations, I am going to follow the same method as I did back in the Network Refactor. This way, when we apply policies for traffic between devices, we can do it in batches.
To do this, go to the Access Control > Groups section of the sidebar.
These are the groups I created to work alongside the internal network. (Might want to click the image to zoom in) 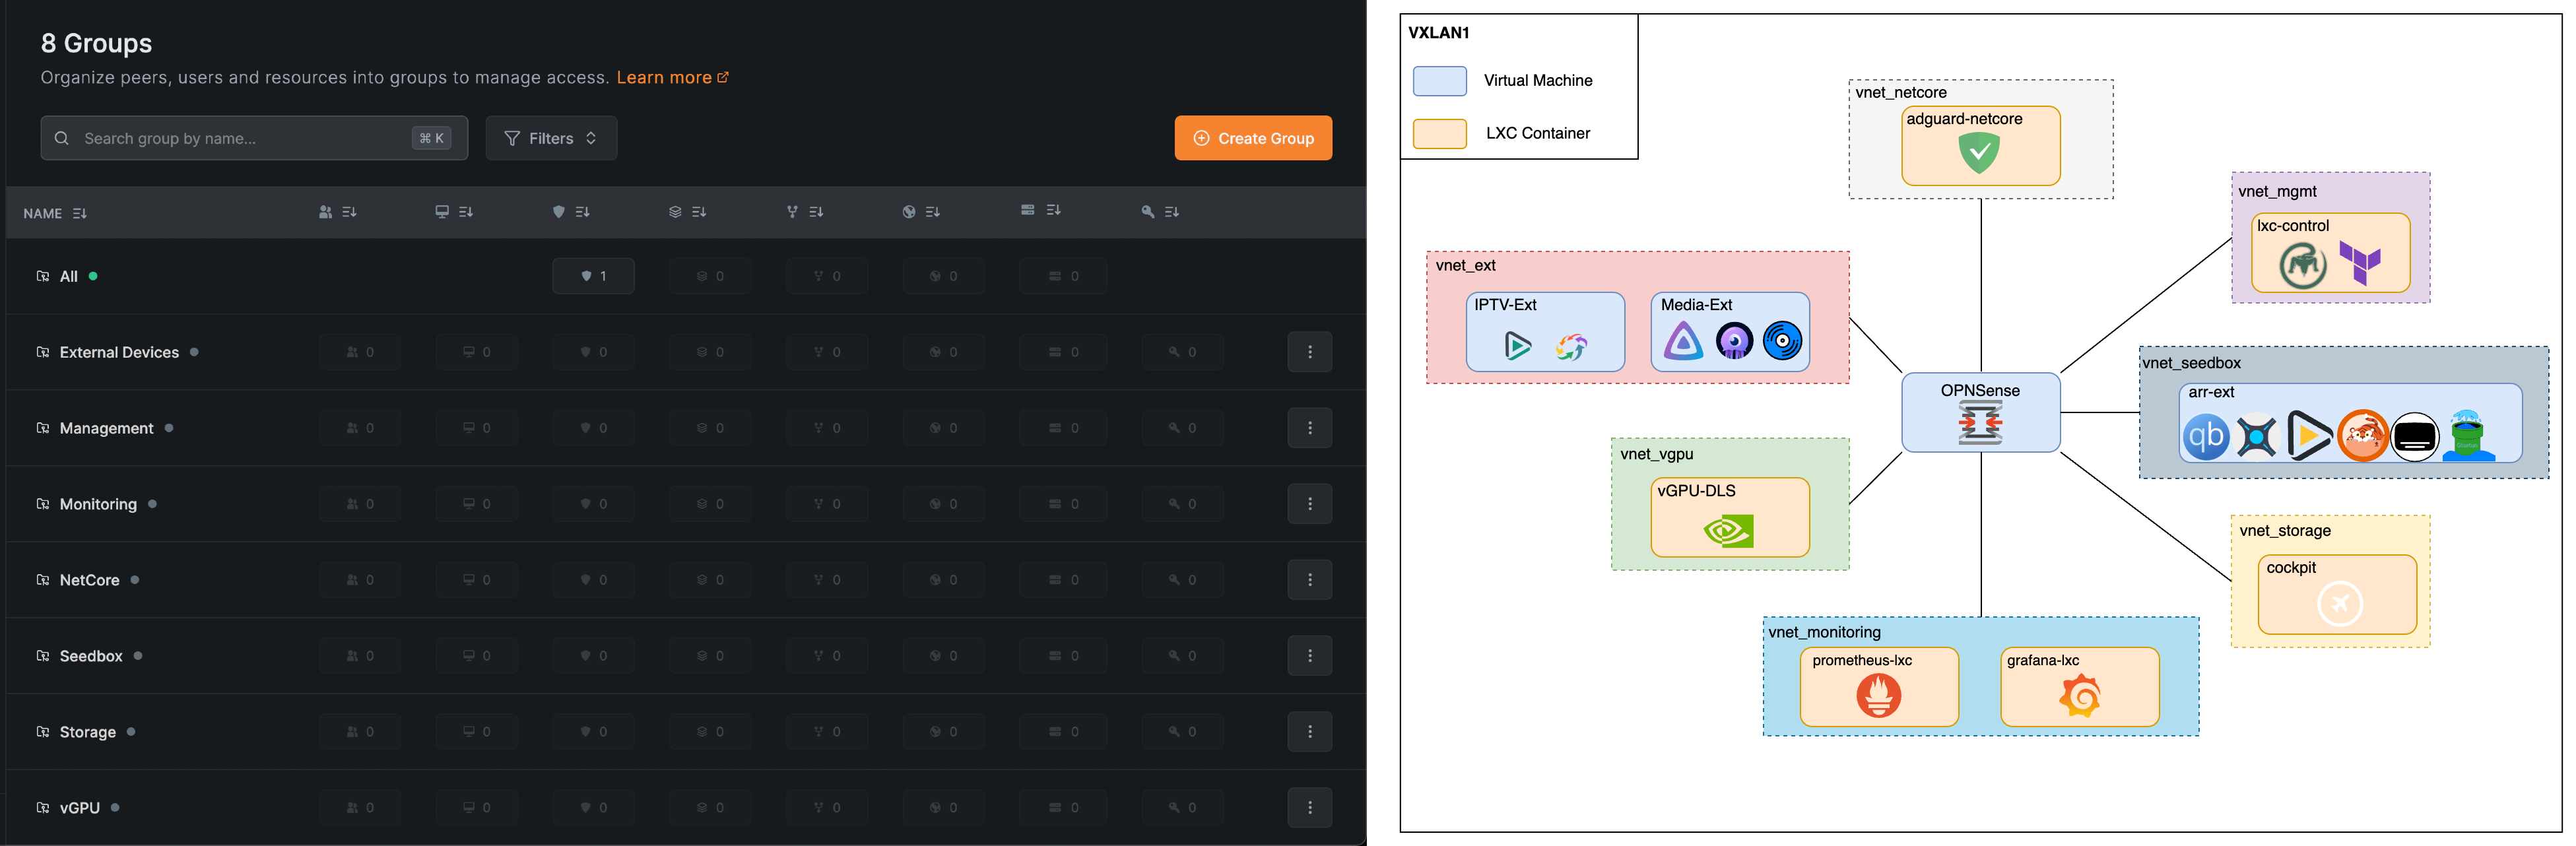
Enrolling devices into groups
Now that we’ve created groups, it is time to start populating them with our devices. To avoid manually adding the peers to the groups each time we set it up, we can create Setup Keys that directly enroll the devices to their respective groups.
To do this, we access the Settings > Setup Keys section of the sidebar. Once there, we create a Setup Key per group. 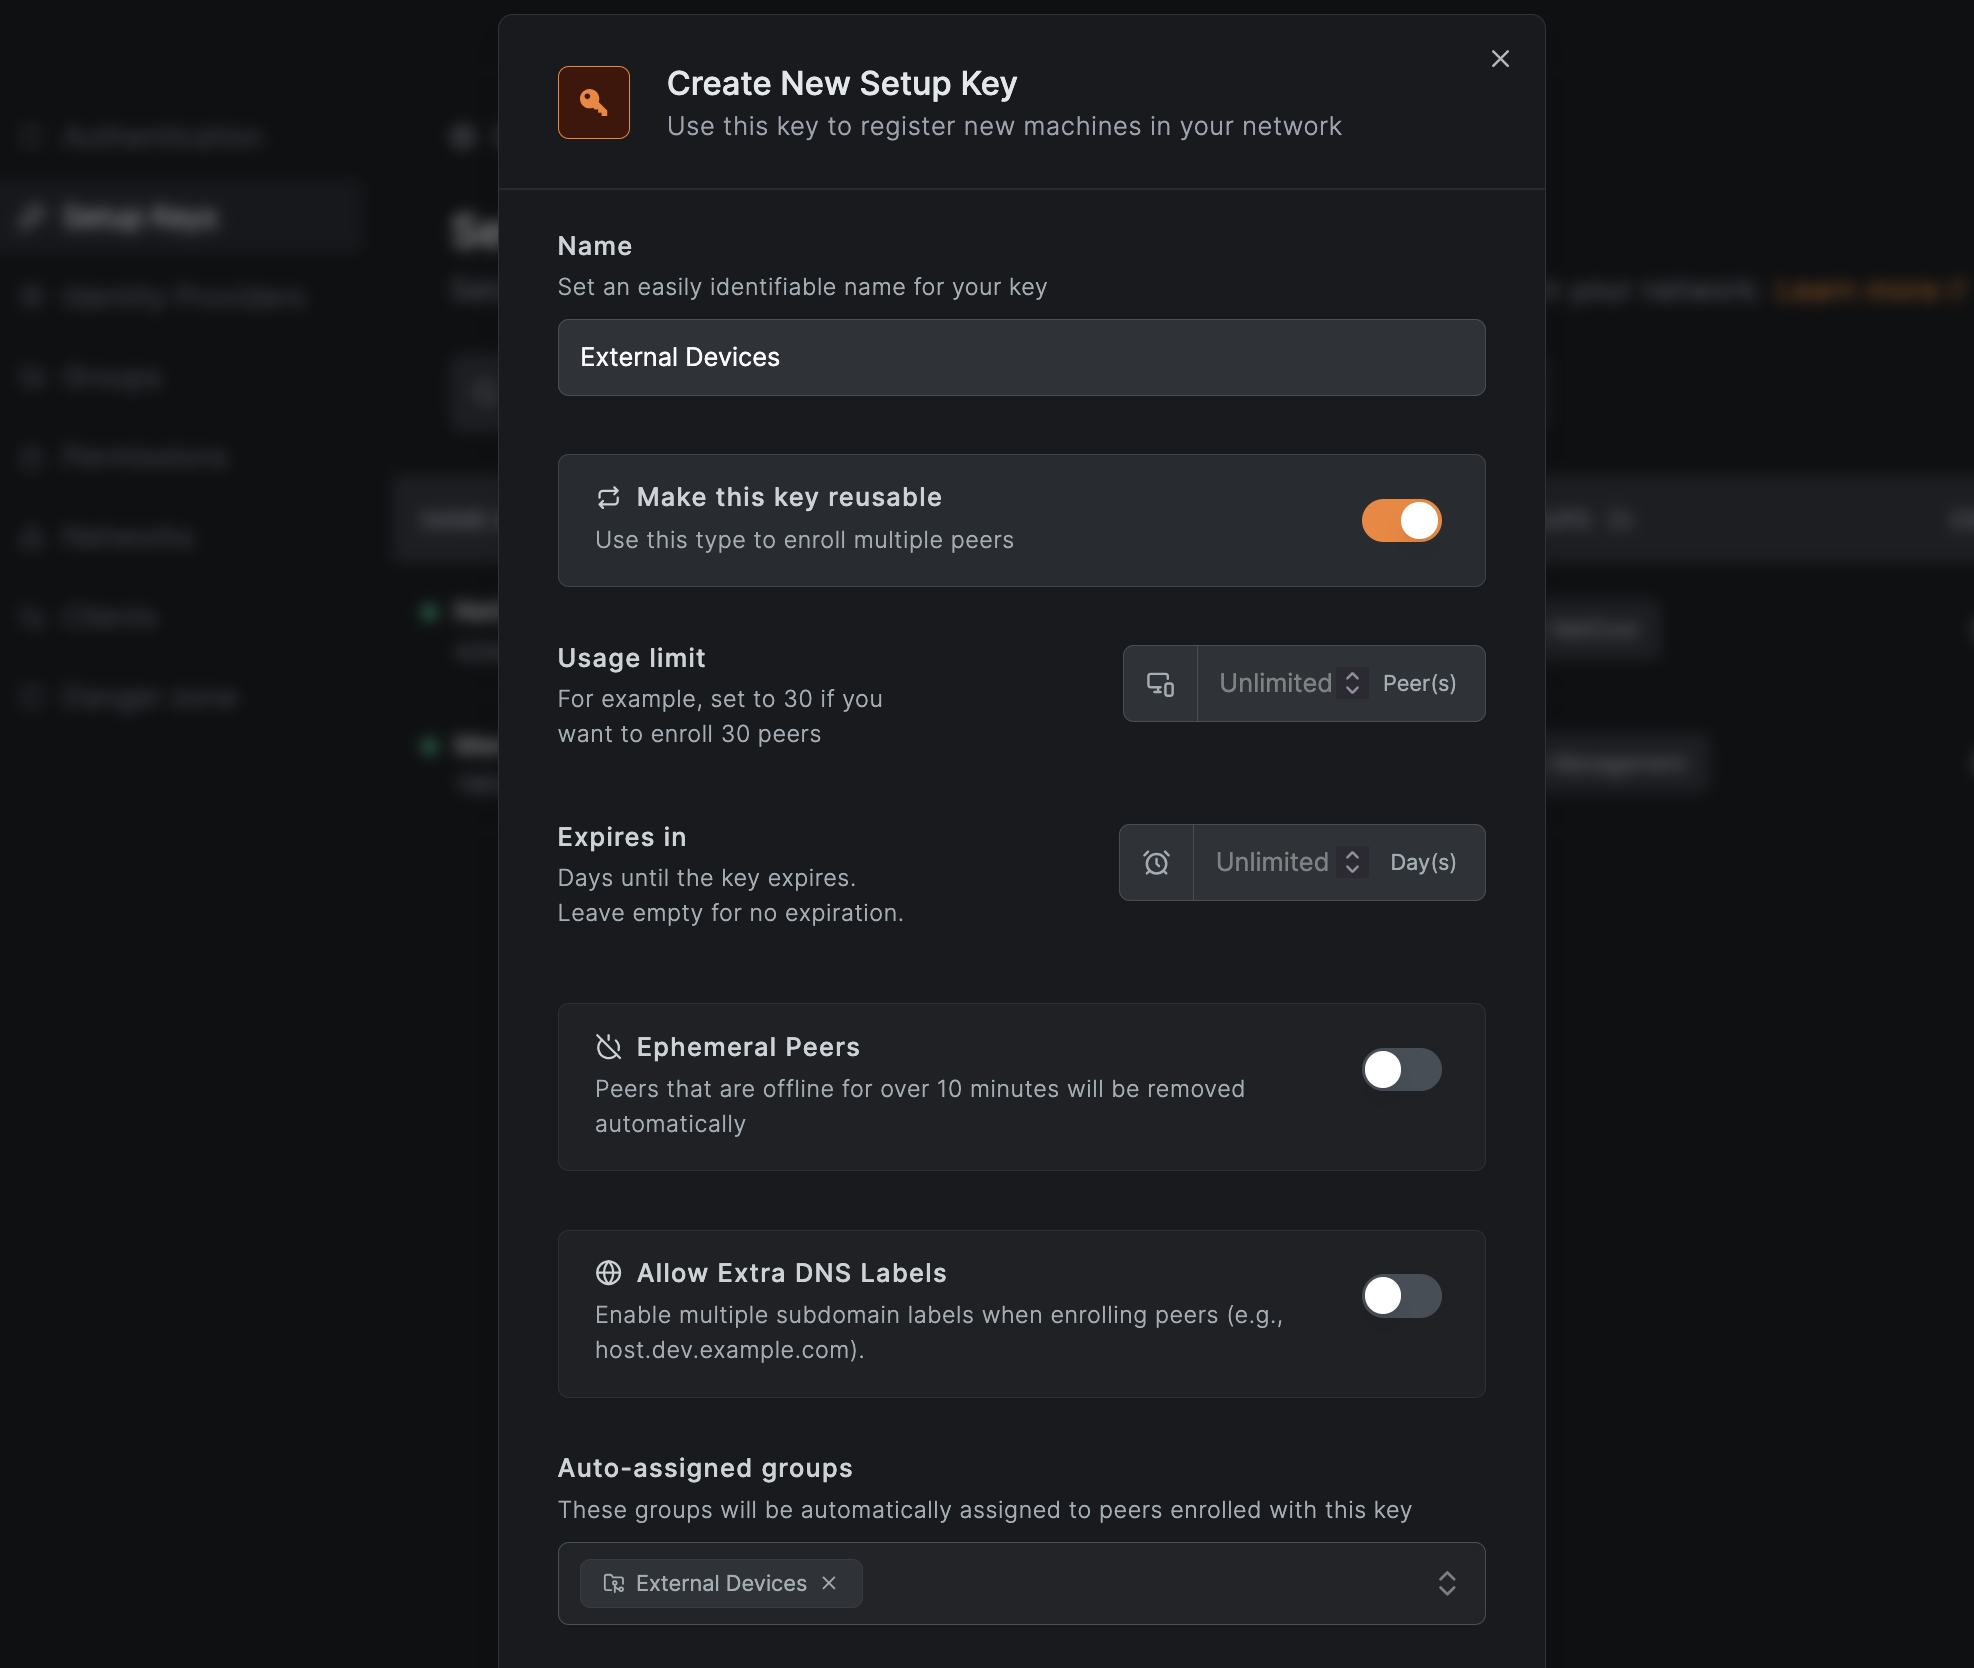
As you can see in the pictures, I am making the key reusable and I am not setting any limits on key expiry or device amount:
- Reusable: since I want to use key per-group, it is imperative that we don’t have to create a new key for each device.
- No Device Limit: While clearly not a “safe” setting, I am in the process of developing my Homelab and I do lots of experimentation, so any device limit could become a nuissance. This is of course not recommended for a production environment.
- No Key Expiry: This is the most blatant danger in this whole setup, if a key is ever compromised the attacker could enroll devices at will with no time limit. I am keeping it this way for the same reason as the device limit, but on a production environment key rotation is a MUST.
Since keys are not shown in the GUI more than once, I suggest you note them down on a secrets manager such as Bitwarden. Once this is done, devices are simply brought up by installing NetBird and running the following command:
1
netbird up --management-url https://netbird.ourdomain.tld --setup-key "our setup key (without quotes)"
Creating Policies
The next step is to actually apply Zero Trust principles to this network. For this, we shall only allow strictly needed connections (in my case, only devices in the Management can access other peers). Since Netbird implements a “drop-by-default” policy (like OPNSense) we have to create a Policy that allows Management group to access the rest.
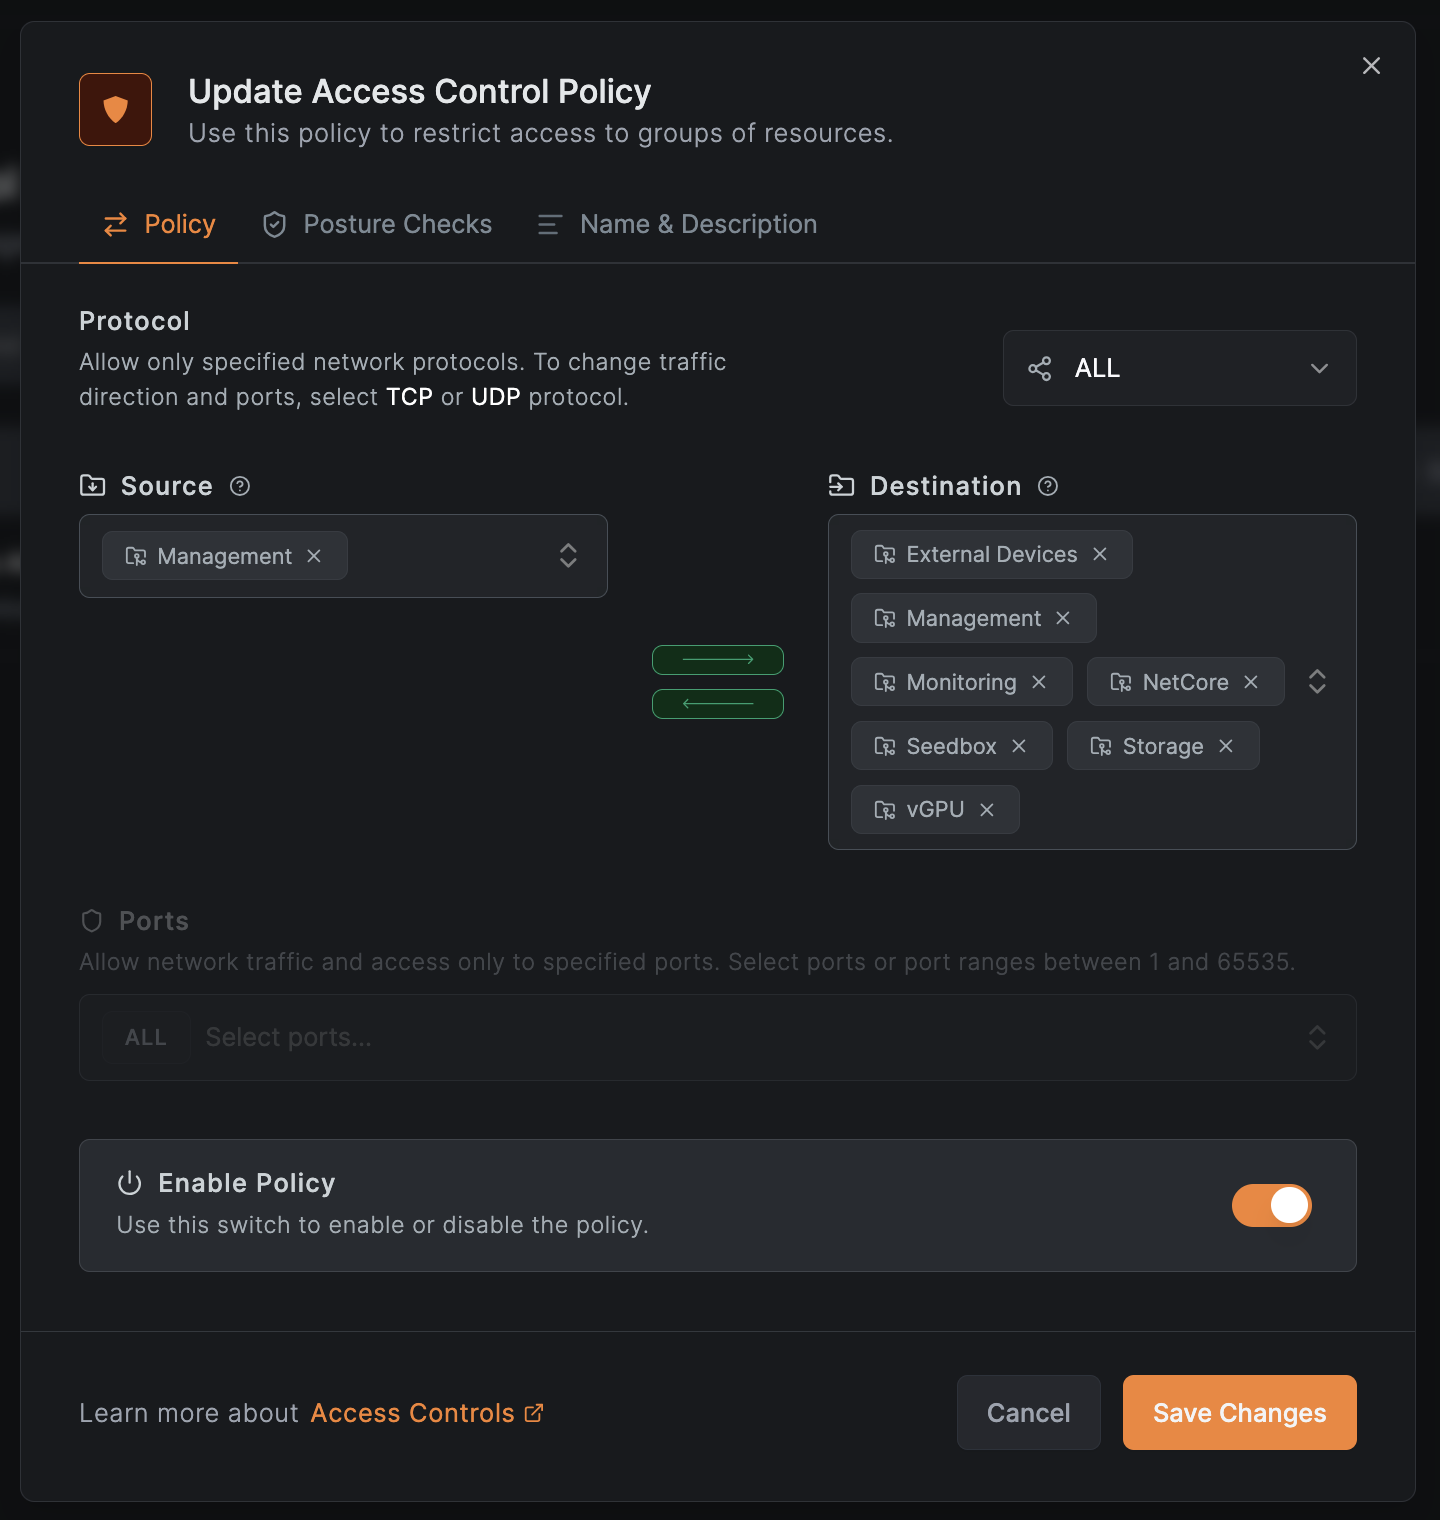
This is a very general Policy, and it could be restricted even more (filtering by protocol, ports etc) but I prefer to keep it this way so my management machines (my phone and MacBook Pro) can access the VMs in my server troubleshoot remotely.
Internal communication between VMs is done internally via OPNSense my OPNSense instance and not at the VPN level (If you don’t consider the ProxMox SDN a VPN, of course).
With our Groups and Basic Policies now implemented, we now effectively have our very own Zero-Trust VPN network. NetBird is a very powerful tool and will allow the user to tailor the configuration to their needs, so take this blog post as an introduction.
Bonus: Exposing your services to the wide internet
Since Netbird v0.65 Netbird includes an option to expose your internal services to the wide web via its internal reverse-proxy.
Before, you had to rely on an external solution like Pangolin to do so (or simple BYO reverse-proxy + wireguard tunnel solutions), but now everything is consolidated in Netbird.
In my case, I use it to expose a Jellyfin instance, since keeping netbird installed on their devices can become a bit of a hassle if it ever goes haywire (which trust me, it happens).
It is as simple as to go to the Reverse Proxy [BETA] section of the Sidebar, and add a target. There it will let you set the Peer Target and its port and boom, your application is open to the net.
Fixing slow speeds.
You could come across Netbird not being very fast to deliver streams in Jellyfin or related. This could be because your connection between peers is “Relayed”. If you’re using OPNSense and NAT, this can be fixed by following the steps explained here.
Closing notes
While it has not been a very thorough post, thanks to NetBird we now have a deeply customizable VPN network which we can use to manage access to our infrastructure without breaking the Zero Trust principles we previously established. I for one greatly appreciate that incredible software like this is Open Source and that all of us can freely host it and make great use of it.
If you want to contribute to their codebase, you can find them at their GitHub and if you have any doubts, their documentation is a very good place to start.
See you in the next one!